Fluid is an audiovisual piece I created using Max/MSP and Ableton Live. In this post, I’ll try to explain some of the motivations behind the piece as well as the technical challenges.
Here we go!
The Vision
Water – specifically water dynamics – is something I’ve been fascinated by for a long time. Watching droplets form on a window; seeing them slowly trickle down and combine into larger droplets – there’s a sense of effortlessness and elegance when two droplets attract and become one, that I wanted to capture visually and sonically. Musically, I thought it would be appropriate to convey the feeling of fluidity – using gliding synths over a simple, regular rhythm and an evolving bass synth. The project would be equal parts aural and visual, so I decided to set up a Ableton/Max project and work on both sides roughly at the same time.
The Challenge
Realtime water simulation and rendering has come a long way in these past few years. The water effects in GTA 5 I find particularly notable: the light of the sun shimmers beautifully against the reflected water surface, and speedboats and jet-skis that ride atop the ocean get kicked up by the oncoming waves, and splash mist particles into the air. In all of its beauty, though, this is an effect that’s been repeated and improved throughout years of previous game titles, using the same overall technique. Heightmapped water simulation is a feature that’s been used in the original Portal (and I assume older games), and sending particles in the air is just a way of masking the truth: the truth that the game isn’t really simulating water particles, but only water levels as they advect through the scene. Therefore it’s not really possible to represent splashes of free-surface water through heightmapped water, without faking it (instantiate particles in places where there’s a sudden change in water level). This is still true for interaction of dynamic objects with water; watch a character in GTA 5 swim atop the ocean surface, and you’ll notice that even though the character is kicking up water, the actual water levels arent’ actually reacting to the character’s movement.
The effect that I (and democoders) really crave, though, is that look of individual water droplets morphing and interacting with one another – the slow-motion water splash in detergent commercials or milk crowns on the front of cereal boxes. Those are things you usually produce in an offline rendering context, though; programs like Realflow are very good at simulating and rendering detailed water effects, and also take hours or days to render. What if I could achieve a similar effect, but in realtime?
Metaballs
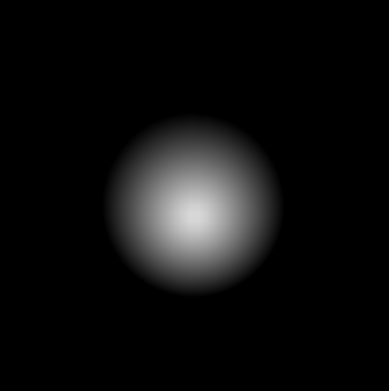
What really constitutes the amoeba-like shape of connected droplets, is something called metaballs: a fancy term for sphere distance functions that are summed together and thresholded at a certain value. Imagine that you have a function f(x, y, z), that returns a scalar such that if (x, y, z) is within a distance of r to a point c, it returns a value between 0 and 1 – 1 when the input equals c, and 0 when the distance between the input and c is equal to r (0 in all other cases). Visually, a 2D version of this looks something like:
Now we add a second distance function with a different c, and sum it to the first. Now our 2D slice looks like this:
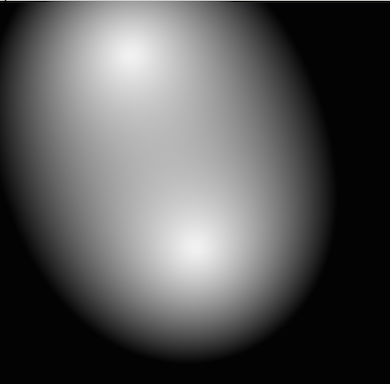
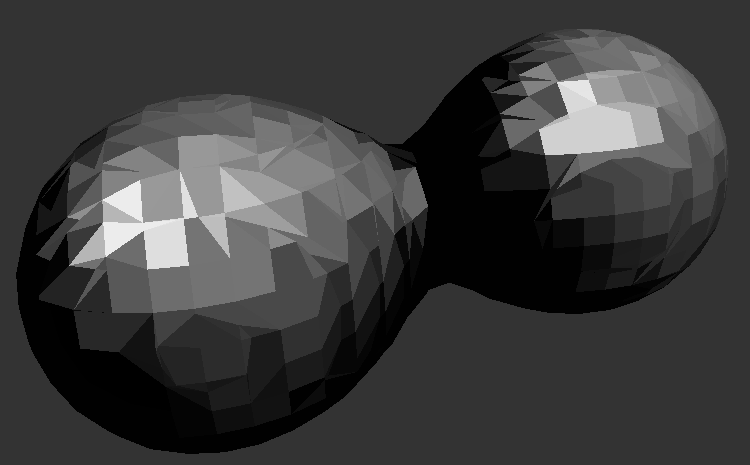
If we trace a contour through the points where the function equals 0.5 (or any value between 0 and 1), we start to get our amoeba shape. In 3D, the distance function is surfaced into a triangle mesh using a (patented) technique called Marching Cubes; fortunately, Max’s Jitter provides an object for us that does this given a 3D Jitter matrix. Behold, the power of jit.gl.isosurf:
And if we smooth shade the surface using a simple Blinn-Phong shader, we get this:
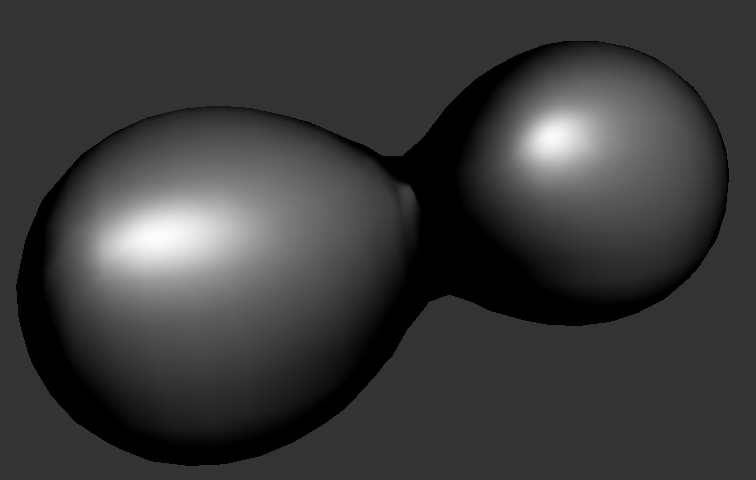
In the piece, cubemap reflection is used to get a chrome-like look on the material.
Unfortunately when creating the 3D matrix using jit.gen), I ran into framerate issues when trying to compute many metaballs. Also problematic was the resolution at which I could store the distance matrix: Max started to lag when I set the resolution of jit.gen to 128x128x128 (understandable, since using float32’s this amounts to 8 MB of memory dedicated to the distance field alone). In the final render, I ended up using only two metaballs, under a resolution of 64x64x64. Such is the life of programming realtime visuals.
In the piece, the metaballs start deforming and morph into almost a sea urchin-like quality at the height of the synth progression. This is achieved by adding a 3D sine wave to the computed distance value. The input to the sine function is the normalized direction from the center of the ball to the input point, so that I get the same displacement regardless of how far the surface is from the center. There probably was a better way of achieving this effect (3D Perlin noise comes into mind), but I ended up liking the symmetry of the sine waves as opposed to a more unpredictable noise function.
Interaction
In the piece, there are 3 kinds of interaction between the music and visuals: 1. The percussion triggers a pulse in the radius of the balls, 2. The Sub bass triggers specular light intensity on the surface, and 3. Automation parameters pertaining to the noise and filter cutoff of the bass synth modulate the amplitude and frequency of sine wave noise added onto the metaball surface. Additionally, the progress of the metaballs’ collapse (the positions of the balls) is controlled by an empty automation parameter in Ableton; I found it easier to record the automation by twisting a knob rather than hard-code it in Max.
In order to fetch automation data in Max from Ableton, one uses the handy Max for Live object M4L.api.DeviceParameter. When sent a bang, this object will return the value of whatever device and parameter it is set to in a range of 0-1.
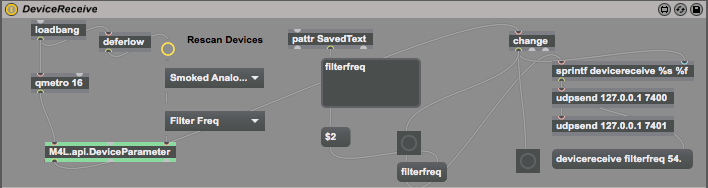
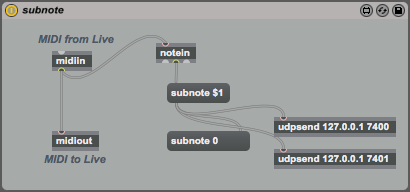
MIDI notes pose a different problem, however; for all I know, Max for Live doesn’t expose MIDI information of tracks other than the one in which a Max MIDI effect is loaded. In my case, I needed MIDI data from two different Ableton tracks from outside the patch environment, so I resorted to using udpsend and udpreceive to send note data between patches. This unfortunately resulted in an inability to freeze tracks in Ableton, because freezing tracks would effectively deactivate the udpsend in the Max MIDI effect, and I would get no signal in the visuals patch. I hope to figure out a better solution in future projects, so that I can maintain interactivity while saving precious CPU cycles.
Lessons learned, and give me your code!
Overall this was a very fun opportunity for me to get to know Max for Live and explore the possibilities and limits of Jitter. In the future, though, I would probably use another programming environment to create live visuals; I often wanted more flexibility and performance when working with Jitter, so much that at one point I even considered writing my own OpenGL/OpenCL program and handling interactivity by attaching an OSC receiver. While I probably won’t go that far into building things from scratch, other programs such as Processing and Quartz Composer seem to do visuals equally well, albeit without the Ableton interoperability. Using OSC receivers in these environments and using Max for Live solely to send out OSC information doesn’t sound that much harder, though, and would likely yield similar results, so I’m excited to test out a different setup in the future.
You can find a visuals-only version of the Max patch here: 15_12_23_metaball.maxpat. Tested on Max 7.0.6 on Mac.